Monday, 18 May 2015
Miscellaneous Vintage Tips
Here are a few tips that I decided to enlist into my latest blog as the shop has slowed down quite a bit. They are common and, not so common. I hope one will be suited to your needs. Instead of more blah, blah, blah, here we go. THIS RING'S TOO LARGE BUT I REALLY WANT IT. There's a fix for that and it's available on that famous auction site as well as every jeweler in town. It's called a "ring guard adaptor". It fits into that ring that is too large to wear on your finger so that it instantly adjusts to the perfect size. Neat little item. I have also had a plain gold band "enlarged" at the jewelers for a nominal price. So, keep your options open when you see that awkwardly sized vintage piece. HEAVY BROOCHES. I JUST CAN'T WEAR THEM. Sure you can. You knew I was going to say that. There's a trick to wearing a cumbersome brooch. Do what some Military men do with their heavy medals. The trick is to slip a piece of light cardboard (cereal box etc.) behind the pin. Floppiness gone. My wife tells me you can also pin the brooch to your bra strap or just pin it "around" the bra strap for a great hold. Don't let the size of a brooch delegate your taste in jewelry. FUR CLIPS! REALLY? The fur may fly, but the clips live on. Think of fur clips as an accessory that didn't end in tragedy and, is still up to date in todays world. Originally meant to pin through a fur hide, they now adorn purses, sun visors, and wallets. They don't just look great as a vintage item, they can still be used as a smart bling accessory! WHY DRESS CLIPS? Let's take a look at dress clips. Those barbs look awful scary! Not really. The dress clip can be used for unlimited uses. Did you know they were originally invented to be worn on the center V of the dress neckline? Well, today they are being worn as a convenient piece of clip and go jewelry. They look great clipped to the front pocket of a pair of denim jeans jacket cuffs, collars, or top pockets. Get creative and clip one to a hair scrunchie. Get a pair of pliers, flatten the barbs, and wear as a one of a kind scarf clip. Best yet is the fact that most come as a set of two. You end up with twice the product for the money.
Tuesday, 17 March 2015
History Of Cuff Link Closures. 1800's To 1970's.
These are my observations as I perused (one by one) the patents from the 1800's to 1970. Please don't hold me too accountable for omissions or small mistakes. I have highlighted years and styles for quick reference.
Here we go, I hope you enjoy.... Cuff links and closures. The cuff link has gone through a strange and varied history. Cuff links are not just limited to men's wear, and the ladies are finding them just as fashionable as men. This is not a new idea, as women wore them ages ago. Going through Patents, I will try to give a brief history of the cuff link and closures.
1800's. Bean Backs, Button Backs, Ball Backs, Clip Backs (finger prong).
Cuff links generally reflect the times they were made in. Cuff links fall into a few categories. Bean backs were one piece cuff links with the back looking somewhat like a small bean, or football. Ball backs were just that, a small roundish ball at the opposite end of the cuff link. Button backs had a small button at the back that could be either fixed (not moveable), or on a centred pivot. Clip backs (as I call them) were generally square and had two clips at the back as the attachment of choice. These clips moves up and down to close or open. Their common name known to most collectors are "Finger Prong" cufflinks. The last photo shows the open and closed position. You would open the cufflinks, put them through the cuff holes and simply close them. The prongs look quite smart as they show on the opposite side of your cuff. See examples of all cufflink styles below:


These were the styles to choose from in the 1800's. All were functional and my favourite are the clip back just because of the closure mechanism. Stones or depictions of flowers, nature, and work (like mining picks, shovels, wheelbarrows etc.) were the norm. Cuff link closures basically did not change much during this era and fine examples are still to be found. Sometimes an older clip back or cuff links from this era will have the patent month, day, and year, or the last two numbers of the year stamped into the back. Antique examples are very unique.
1900-1910 bean back and ball back.
Bean back and ball back cuff links continued into the early 1900's. Although the styles were changing with a bit more design on the fronts, button back and clip backs were falling out of favour.
1920's. Snap cuff links, swivel back, double sided, retractable chin, and the collar button with tie stay.
The 1920's went into high gear in the cuff link trade. Types of closures seemed to spring up everywhere and were all vying for top spot. Two piece snap cuff links (second photo) had just emerged. See below.


Other styles included cuff links with ends that moved on each (or one) end connected by a bar or wire. Swivel back ( a smaller example of the button back pivot, and over all looking a bit like a bean back) became popular. Double sided stationary cuff links, that did not move, connected by a single shaft. Pull out spring loaded cuff links. The first retractable chain cuff link. Collar button with tie stay, (looks like a small button with an elongated triangle on the opposite end). The button half went through the collar holes and the triangle part hooked onto the tie. The first patented crude tie clip with jagged teeth. Cuff links connected by a chain. The options and choices must have made them feel like modern times had finally arrived!
1930's. Snap cuff links, double toggle, and large bullet toggle.
were having their final decade. Some of them were being made with semi oval extensions in the hopes of wooing the public. But the snaps were thought to be hard on clothing and they were fast falling out of favour. 1936 brought in the first patent on the modern day toggle closure. Pat. # 002052437 was attributed to H. G. Anderson. Amazingly, a double toggle also came out. The cuff link was comprised of a toggle closure on each end. That's it. That was the cuff link! The first solid closure that I refer to as a "bullet" toggle also came out. Unique in shape. See photo below:

These "bullet" toggles are rounded off at each end like a bullet. This style was more the exception than the norm. They will be smooth with no cut in circles at the ends. The toggles will be longer than those produced in the following years. I think they look cool as hell, by making a smooth classy transition to the end of the cuff link. Some say toggles were not widely accepted during the 1930's but, by the look of the number of patents on them, they sure were waist deep in 1930's cuff link history.
1940's. Today's rounded end toggle, oblong toggle, flat end toggle, and slanted end toggles.
Cuff links finally settled in to look more like today's closures. They were rounder and the ends had that little extra cut in piece for aesthetics. Some toggles were "fixed" and did not move so were clearly not toggles at all. The first "oblong" toggle was out. See photo below:

Below: Classic 1940's cuff links feature "lines" on toggles and shafts.

Unlike the round bullet style, the oblong cuff link closure was flat on all the lengths and only rounded at the end tips. Sides were not rounded. Closures also included a flat end toggle with four straight sides, imagine a rectangle. Chain cuff links also came into vogue. Two metal ends with a simple chain to connect them. The 1940's were moving closer to today's standard.
1950's Clip on cuff links, barbell toggle, hinged folding cuff links, whale tail, short bullet toggle, and a double top V cuff link.
We kept on using some of the same closures. The oblong toggle was one that held strong and continued into the 1950's. A new addition was a clip on cuff link where a toggle went through the button hole on one end, and a money clip looking attachment ran around and just slid on to the opposite cuff. A unique toggle that appeared in the 1950's was a toggle that looked like a barbell. Round in the middle with a ball on each end. Actually, quite a nice look that just didn't seem to continue for whatever reason. The barbell toggle was a very classic 1950's addition. The double toggle cuff link also resurfaced. Two toggles and a shaft. The toggles were the cuff link heads. Odd, but serviceable. Folding cuff links were having a resurgence as well. Most of these were cuff link heads attached to what would look like the bottom half of a safety pin, but with a working hinge. Another type that should have held on, consisted of a "V" shaped wire. The toggle was at the bottom of the V cuff link. The two ends of the V each held a small cuff link head. Imagine, two cuff link heads on each button hole! Great invention, but unfortunately it also got passed by. The fifties had kept the standard closures, while the experimental types never seemed to make it far enough down the runway to fly. The slightly rounded two piece whale tail toggle. They took a slightly rounded head piece and added a flat bottom held on by two metal clips. See photo below:

I'm not sure why, but I believe this was probably a cost saving measure as this made the inside hollow and less expensive to produce. The first patent I have seen for this was in 1949.
1960's. Rectangle toggles with round ends, mesh cuff links, and double toggle cuff links with rounded (rather than square) ends.
Rectangle toggles with round ends also came in fashion. Bullet toggles also returned but were shorter than the originals. Another style was a solid toggle that when viewed from above was wider in the centre and then slimmed down to rounded ends. Somewhat like the bullet style, except with a much wider centre where it met the shaft. Finally today's classic toggle had arrived. Round with etched machined points. Another curiosity had returned with a slight twist. The two toggle cuff link. Only now, each end was now oblong instead of rectangular. It kept trying.... In 1968, the first wrap around mesh toggle came out, Patent # 0003418699. A new style had finally been developed and time would be the judge of its longevity. It didn't last more than another decade. See photo below for an example of a mesh wrap around cuff link:

1970's. Cuff link bracelet, interchangeable cuff links, cuff links with a safety chain for the toggle, and a toggle with safety wire wrapped around it.
Cuff link designs were more about safety than reworking the closure mechanisms. The mesh style cuff links as shown above seemed to have waned with the seventies, and their popularity began to fade. One interesting design that did come out though was the "cuff link bracelet". It consisted of a bracelet that went around the outside of the cuff and was held together by a toggle or a separate cuff link put through the bracelet's end holes. Imagine a more bejeweled and larger sized mesh wrap cuff link. You ended up with the best of both worlds. A snazzy bracelet and a pair of cuff links! The next idea I personally think was great. Interchangeable cuff link heads. Didn't like the look for tonight's presentation? Snap on another look, and be a new man in seconds! The seventies seemed to be just as much into securing your cuff links. A small plate was invented to fit over the toggle when it was in the open position. When the toggle closed, it held the cuff link securely in place so if the toggle turned a bit, the cuff link would not fall out. Cuff links with a safety chain. The chain ends had rings. One ring was attached permanently to the shaft. The other ring slid over the toggle after it had entered the button hole. Secured! Another unique invention, the wire toggle. This was a wire that wrapped around the toggle which prevented the toggle itself from moving in either direction. Looked as good as it worked. Well, there's my quick rundown of cuff link closures. I'm sure I have probably missed a few. I was just looking through the patents from the 20's to the 70's and thought I would post this as a small info. blog. Please bear in mind that quite a few of these designs carried on into later years and the beginning dates are just that, the years of patented invention. I hope you enjoyed this small look at cuff link closure history. Please visit my online vintage shop to see some of these examples for sale. Just press the link below.
Thursday, 6 November 2014
Vintage Jewelry Repair
After a bit of thought, I've decided to write a short article on vintage jewelry repair. Most of this is common knowledge but there is always someone who needs a little info to go ahead with that repair. If you have decided to throw the piece out, why not try a little repair first? If you can live with a bit of disrepair, then this blog probably isn't for you. I do not reccomend working on a piece of jewelry in fine working condition, or a piece you can't live without. That being said, lets give it a go. COPPER-BRASS-The first item deals with copper and brass. Lots of bracelets, necklaces, and more vintage items contain these metals. A lot of these have long since lost their original coating and will rub of onto your skin. Brass will turn black on your skin and copper will turn green. Mostly due to the interaction of salt in your sweat. Two fixes that work quite well for both of these problems are clear nail polish or common "clear coats" sold in hardware stores. Please be aware that either of these may or may not give an allergic reaction if you are sensitive. And always wear gloves. Some are allergic but most are not. Coat the vintage item with this sticky coating on the inside part. Inside of cuff bracelet, bangle, ring, etc. A good rule of thumb is coat, let dry, coat a second time, let dry, and coat a third time and let dry. This should last quite awhile with no coloration to your skin. Don't set your item on a paper product or it will almost permanently stick to it. An old piece of wood, metal, or disposable plastic lid will do just fine. Fantastic way to be able to wear those forgotten pieces again! MISSING STONES AND STONES THAT HAVE FALLEN OUT. Next, vintage stones in jewelry. For glued stones, it is a fairly easy process. Say your favorite piece has just lost a stone. S..t! Now what? Well, check your local mall and ask for jewelry glue at any jewelry counter. Nearly all family department stores carry it as well as the new "five and dime stores" LOL. You do not have to buy it at a jewelry store. Glue isn't stickier because it came from a jewelers! Get out your glue, your piece, your stones, and a damp piece of tissue or paper towel. Squeeze out just enough glue so that you see just the beginning of it coming out. Dab it on the setting. Remember, too much glue will gob the stone up. But try it because, it really isn't hard to do. Next, wet your finger tip by licking it and, touch the top of the stone. It should stick nicely to your finger. Place the stone into the glued setting and push down. Slide your finger to the left or right to release your stone from your finger. Wait ten seconds if the stone looks well placed. If not, take the stone out and retry. Take the damp (almost dry) paper towel or tissue and g-e-n-t-l-y wipe off any excess glue before it dries while pushing down lightly on the stone. Don't dry or use dry tissue or paper towel as it will stick to the glue. Let set overnight. May get it first time, may take a few tries. But that piece is again useable. Add another stone from another piece if you prefer. For a missing stone in a prong set piece, simply pry two prongs to the up position, drop in the new stone, and then push the two prongs back down (no need for glue). Don't be afraid to try these suggestions. You're probably not even using the piece. CLOSURE PINS THAT DROOP TO THE BOTTOM. (see pictures. Had to squeeze both ways. Now has proper pin placement)


 Not really annoying or uncommon in a vintage piece, there is a fix that will work 75% of the time. It's a pretty safe repair and worth a try if your pin drops to the bottom and it annoys you. You simply need to go to the hinged part of the pin (the opposite end of the "pointy" part). The pin is held in by a small "wall" on each side with the pin part being in the middle. Leave your pin in the open position, preferably as far open as it will go. Take a pair of flat pliers or a flat "plier looking" crafting tool ( I forget the name of the item, also available at your local five and dime in the craft section) and squeeze these two walls together. Close your pin and it should be back up in position. If not, give it another squeeze. Occasionally, there will also be a small piece of metal in front of these two walls. You can also squeeze this in front to back instead of side to side like you did the walls. As a caution, do not hold the piece and bend the setting left or right as this may pull the closure right off. Just put your pliers near the top of the walls without holding the piece and squeeze. This may leave a mark or may not, but the pin should be back up and in place 75% of the time. If not, no harm done and you will still be able to wear it with old droopy. WIGGLY PIN CLOSURES. Ever get a brooch, scarf clip, etc. that wiggles as you're grasping the pin? That is generally due to the piece that connects the pin housing to the center of the piece. Where the bar attaches in other words. In vintage jewelry, these pieces are generally made of a soft metal. You can actually take a small metal object and press down on the edges of this connector to "fan out" this metal onto the bar or connector. This is why it was loose, the use had just shrunk the edges a bit and it now wiggles. Connectors will generally look round or square and I suggest you press on the edges and NOT the middle. Be careful not to let your pusher piece slip and hurt yourself. Just push down on an edge at a time and see if it stops wiggling. If it does, you don't have to continue. This fix WILL scratch the piece a bit and may look a bit messy in the middle when you're done so, only do this if you don't mind the messy look. I'll post a couple of pictures of these suggestions for those brave enough to try them. REMEMBER: Any of these methods as with any repair can occasionally go wrong. Please wear gloves and eye protection when using any of these methods. I am not an expert but have personally used these methods for repair. All of my suggestions should be used at your own discretion and I won't accept responsibility for any problems arising from these methods. Please use at your own risk. Have a great day! Rob Marshall at http://
Saturday, 7 June 2014
Cleaning Vintage Jewelry
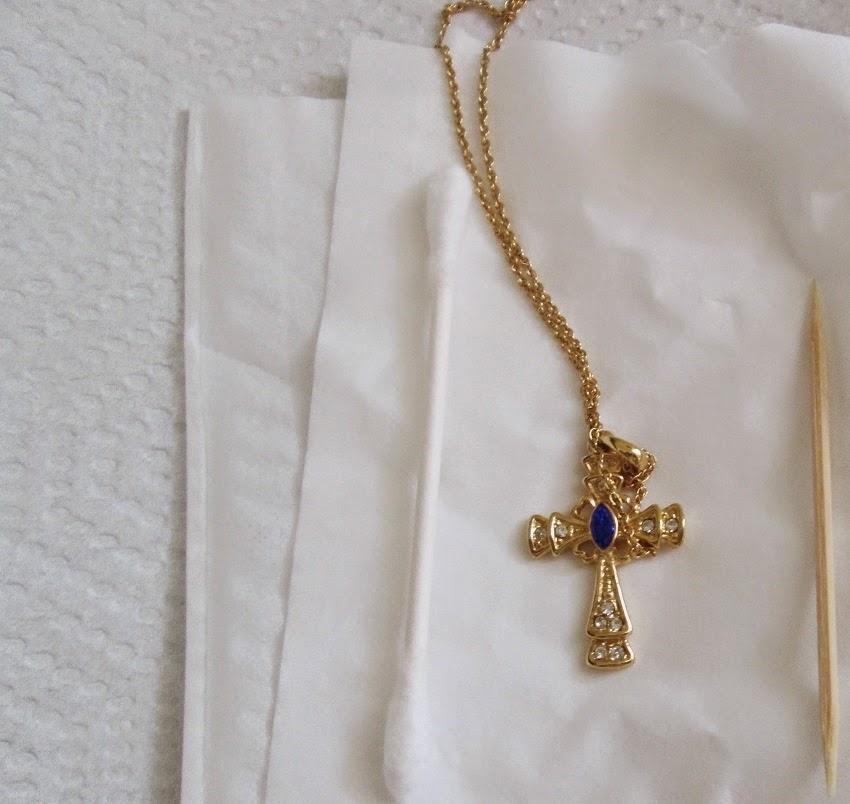
Today I will discuss cleaning vintage jewelry. We all have or have had a piece of vintage jewelry that we've bought second hand or accidently spilled our coffee or ice cream on. Oops! What now? Well, a lot depends on the type of jewelry you have. If your stones or cabochon are prong set, then you have a little more leeway in the cleaning process. If your stones (or cabochon) are not prong set and glued in, then a little more care needs to be taken. First I suggest a quick in-out dip in luke-warm water whether or not the stones are prong set. Hot water will disintegrate glue or, turn the glue a milky white color if left on too long, possibly causing the stones to fall out. Dip your jewelry in and out once. Clean top of stones lightly with a soft piece of tissue or paper towel rubbing lightly over stones. Try to avoid cloth as it can, and will, catch on jewelry parts. Continue until you are happy with your cleaning result. Now dry stones by pressing a fresh piece of tissue or paper towel on the stones. The tissue/paper towel will naturally absorb any moisture, so you don't have to rub, just press. Continue process until tissue or paper towel remains dry when pressed on the piece. If you have a gunky mess on your piece, wet a cotton tipped swab (again with luke-warm water) and rub back and forth until the heavier stuff is off. Another great trick is to quickly wet the piece and use the pointy end of a toothpick. Works great for those hard to get at areas and gives your cleaning a bit of "safe muscle". I know, why bother with that when I can pick up cleaners in a jar. Well, those cleaners in a jar are very harsh, even the gentle ones are harsher than you think. Like water, they will disintegrate glued on parts, so be careful. I've run a few tests myself and found that if you do decide to clean with these products, then leave your jewelry in for half the recommended time. I've done it, I've tried it, and it doesn't come cleaner by leaving it in the full recommended time. Sterling silver jewelry cleaner is the same. Just leave it in for half the recommended time. You can always re-dip the silver after it has been dried. Whenever using these commercial jewelry cleaners, remember that your jewelry has to be rinsed off in water so the piece doesn't corrode from the harsh chemicals in the cleaners. So remember what you will need is shown below. Gloves, tissue or paper towel for stones. Cotton swabs for heavier soiled areas. Toothpics for hard to reach stubborn areas. As a footnote, I do not recommend toothpaste as it is abrasive. It does clean quickly but it can also leave scratches and can be hard to remove from stone settings and other tight areas. If you feel you need soap, a wet paper towel or tissue dabbed on a bar of hand soap is acceptable. Lastly, that annoying green stuff that sometimes accompanies an old piece. You've seen it, the annoying crusty green hopelessly hanging on to the metal. Seen it, have had lots of questions as how to get rid of it. It looks like the stuff on a battery after it's been left in a toy too long. Simple answer, and the most effective, is to get (better off to borrow as you don't need much) some calcium/lime/rust cleaner available just about everywhere. Dip a cotton swab in it and lightly rub on some of the juice. Count to 30 and gently rub at the green with the same cotton swab. Use the very bottom cotton part on the stick to get into corners. You can also gently use a tooth pick. I've personally tried this as a last hope on a 1940's piece, and it works! Finish off by wetting a paper towel or tissue and wiping off the chemicals. Use another to lightly dry it off and, ALWAYS WEAR GLOVES AND EYE PROTECTION WHEN WORKING WITH CLEANERS. I am not an expert, but these methods have been used by myself. As with any repair, things can go wrong, so use these suggestions at your own risk. I hope this has been helpful to you and if you have any cleaning tips you would like to add, just post it to our blog. Have a great day! Rob Marshall at http://
Monday, 2 December 2013
Vintage Crafting
Vintage Crafting? If you love vintage, why not incorporate it onto your walls. Check out my inexpensive "faux shadow boxes" below. The thin one is actually a display for a graduation tassel. Ran me $5.00 bucks at a local annual book sale. I removed the back and added packing foam that I glued on to the backing. My vintage Thai Buddhist Amulets were hot glued into place. Voila! Instant vintage art. My two double raised glass picture frames were purchased for $1.50 at a local store. We went on a multi beach excursion this past summer and collected a lot of beach glass, shells, etc. I'll always remember that trip because it's on my wall. Again, I simply removed the backs, added shiny black crafting paper and hot glued beach glass on one and various beach finds on the other. Very easy. Fits in nicely with a vintage or beach theme. The same can be done with vintage jewelry. A nice collection of "not so wearable any more" earrings could be displayed in this fashion. Brooches, or stick pins, are another suggestion. I've recently seen sports tack pins displayed in a wooden frame. Your imagination is your only limit. Don't forget to check out our online vintage shop at http://


Subscribe to:
Posts (Atom)