Showing posts with label vintage jewelry. Show all posts

Saturday, 16 November 2019

Is This Brooch Vintage? Pt. 2

DISCLAIMER: Dating a vintage brooch without an ad is subjective and not everyone comes up with the exact same date. The dates I give below are determined through research and, my own interpretation of the costume jewelry eras. You may not agree with my findings. If you have, or are about to buy, an expensive piece I would urge you to seek a more professional second opinion.

Is This Brooch Vintage? pt. 2, will focus again on the back of your brooch. We can rely a lot on style, thickness, and the brooch's "setting". The setting is the frame that holds your pin attachment. Please note that all of these settings, styles and thicknesses can be made today, so please be cautious when purchasing your piece. Let's begin.
  Antique brooches dating from the 1800's till up to about 1920, generally had just a pin that ran across the top and settled into a C-clasp. Earlier versions included a thin wire or thicker metal C. Victorian Era pins extended past the brooch itself in most cases. Wide C's which included a wider metal for the pin to go into were more popular from the 1920's on. The pieces were made of different metals with, and without, enameling. They also came with or without stones for adornment. They also had a somewhat "heavier feel". The metal was almost always a silver tone, gold tone, or grey. Better pieces were made of gold or silver and could be adorned with stones. Occasionally, average pieces were painted on the back to mask the fact they were a combination of metals. You are more likely than not to find some wear, heavy patina, or discoloration, including paint and enamelling loss. See some examples below:


Antique brooches


Antique brooch backs


Antique brooches.


Antique brooch backs


  The 1920's jewelry can often be found in a thicker metal. They may be plain, painted, or enameled. Bejeweled with stones, or not. Their closures included spin closures with small nubs on the spin "heads" and, a very few dying out C clasp closures. Example below:


Photo of a 1920's brooch.


  The 1930's-1940's jewelry backings (with some exceptions) were often adorned with filigree, as well as faux filigree, on both the front and back. True filigree was made with single wires and woven or formed into the jewelry piece. You are more likely to find "faux (or false) filigree" made to look like wire. Ornate styles were becoming more complex in their structure due to machinery. It was now the norm, rather than the exception. Rivets were being used to layer the fronts onto the backs more commonly, again, with a pin across the back which now includes a spin clasp closure. The pins often had a rivet to hold them on as pictured below. The pieces were of varying sizes and the metal was general thinner than in the previous eras. Pieces from the 30's to 40's will have a very ornate look and will be a bit thinner than previous pieces. The debate on rivets generally assumes these pieces to be later, say, the 50's-60's. My research shows rivets have been around since somewhere around the Roman Era so, I do not hold water with those conclusions. See examples below:


   The 1950's and 1960's jewelry did change as the manufacturing processes became more industrialized and, thus better equipped to handle more complex as well as cheaper manufacturing. One mentionable addition to the 1950's jewelry trade was the introduction of the first Aurora Borealis stone. Contrary to popular belief, the first Borealis stones were golden in color. Nearly all 1950's/60's brooches will have a V or curved Pin setting as shown below.

It wasn't until the 1960's that AB stones became a standard in popular jewelry in North America. A few examples below:

1970's jewelry, for whatever reason, again became made of  thicker metal. Maybe it was the influx of foreign manufacturing practices. In either case, heavier set jewelry in base metals became the norm. Whether this was due to the as foreign imports or, the home made manufacturing trend, it is unclear. Some examples below:
The 1980's began again with a lighter metal and generally plated with a thin coating to look shiny yet save on costs. Very shiny, very "anything goes" kind of look. These pieces were generally mass produced and were becoming so inexpensive, they were almost known as "wear and toss pieces". It seemed the uniqueness we knew had been so mass produced at this point that jewelry no longer became pieces to be cherished. What vendors sold by horse and buggy was now available at your local corner store. The distance no longer kept jewelry pieces in the heirloom range. After all, they were now readily available to all. Heirloom jewelry is now considered to be "expensive made to order pieces" consisting of precious metal and stones.


Saturday, 12 December 2015

Is My Shell Cameo Antique?

Photo of a shell Cameo.

Today I will discuss a few simple ways to judge if your shell Cameo is real or, a close second. Please forgive the letter spacing as the blog has gone a little wonky on me.  Let's start with a cameo I have in the shop and take a look at what you should look for when buying an antique shell cameo....

Photo of the back of a shell cameo.


     Lets begin by looking at the back of the cameo. In the first photo above, you will find a smooth surface. It isn't uncommon to see scuffs or fine cracks from age and use. Don't run from the cameo if you find them, they are normal and should not worry you too much. Deep cracks will lower value. The cameo back should feel smooth and have a bit of a glass like shine. Most shell cameos are in ranges of pink (or blue). Not all, but the majority. So far, all looks well. What you do not want to see are small pits or pinholes all over the back. Another thing you do not want is a milky color or, melted look. These generally do not indicate an antique piece and you should probably keep searching.The next thing you should see is a concave back. This means the Cameo's shell should be indented. Imagine the indented bowl of a teaspoon and you will exactly get it. If it is a little hard to tell, as in this photo above, feel it. As your fingers run along the face they will feel the indent. The outside of shells are not flat. Neither should your Cameo be flat. Hold the Cameo up to the light. It will be translucent. You should be able to see the opposite side of the cameo just slightly, as if looking through a haze.

Photo of items used in hot testing.

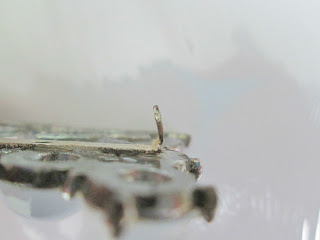
     The third thing you want to do, and I caution you on the danger, is to heat test your piece. Now if you are going to spend money on an expensive antique Cameo, make sure whoever you are buying this from (other than a reputable jeweler) is willing to do this for you. It does not hurt the piece. It doesn't damage the piece in any way. Unless, it's fake. There is no reason I can think of where a person would not heat test the Cameo for your piece of mind. Below, is the implements that I used to heat test this particular piece. You can do this as well, it isn't hard. For this you can use any small metal sewing needle, piece of wire, anything small metal and pointy. For this photo, I chose an old brooch that was beyond help. I am using a clamping item available at any hardware store in the fishing aisle. They are used to pull hooks out of a fish but, they are useful for jewelry if you want to change bails or jump rings. This pair locks shut so there is no chance the pin will come out and burn you. Stuck? Use a set of locking vice grips. Whatever you do, make sure your holders lock. The pin will be very hot. Too hot to touch. You don't want to slip up and get a nasty burn. So, don't just use a set of regular pliers. Any item you use should lock. O.K., enough safety blah-blah-blah.
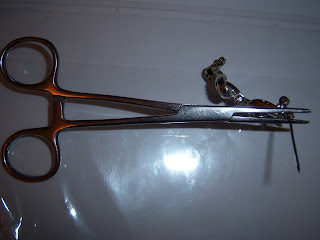


Photo of a brooch pin for hot testing Cameo.


  Unlike me, you should now lay your Came upside down on a towel or, other soft item. The next thing we need to do is to get that pin hot! Use a lighter, use a torch, use your stove (watch your sleeves) anything at your disposal. Once you have your pin hot, lightly place it on the Cameo in a prearranged inconspicuous spot. If it creates a hole, you don't want it to be the first thing you see if you intend to keep the fake. I prefer to test the lower portion. As the pin is hot, you will not need a lot of pressure. Hold on to the count of three. Remove the testing items and set them down on a heat friendly surface like the metal on your stove top. If your Cameo is a genuine shell, no harm will have been done. What you don't want to see is a hole left by the pin. This means the piece has melted and is not a true antique or vintage shell Cameo. Sorry....

Photo of Cameo heat test.

  Now lets take a look at the front. Here we see a lovely young confident lady. Lets take a closer look at her details. The details you should look for. Turn the Cameo on its side. The white on the front of the cameo should just graze the surface. You don't want to see a large lump of excessive white. Though not shown, between the nose and hair you can see the shell and a thin coating of white. Make sure you check all angles because the white can appear to be large face on but, on closer inspection it is not. The next thing we will check on this lady is her hair. Notice how the hair is upswept. Most antique Cameos have this feature as opposed to hair hanging down which is more of a vintage Cameo trait. We next want to look at that cute little nose. It should be Romanesque. This was the style most adopted for antique Cameos. Another common feature of an antique shell Cameo is the attention to detail. Crisp, distinguishable lines as seen here in her hair, mouth, eyes, and chin. Flowers are another great sign. They were often used to adorn hair and clothing in a Cameo of the era. Cameos of this age can face either right or left. Right facing Cameos being the most common. This one was possibly made by a "southpaw".
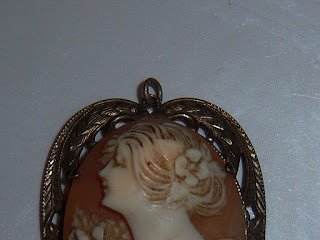

Photo of top half of Cameo.


Again, on the bottom we see lots of attention to detail. The dress neckline has nicely carved lines and is adorned on the left with a spray of leaves and flowers.


Photo of bottom of Cameo.

    Just one more part on the front to focus on. The edges of the shell Cameo. How did they create these miniature works of art? Well, they were carved by craftsmen. And, that is exactly what you want to see. Check the edges for cuts or "whittle" in the shell as shown under the prong in the picture below. Look a little further up and you can see the edges are not perfect. They have been expertly whittled down to create the masterpiece from a single shell.
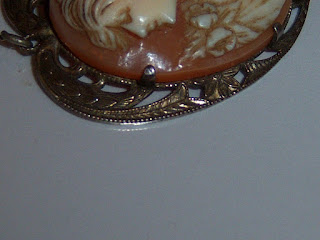
Photo of shell Cameo whittle marks.

     In the end, beauty is in the eye of the beholder. Real, not real, shell, stone, coral, everyone has their own idea of what they want in a vintage or antique Cameo piece. Real antique cameos are not an everyday wear.  You should consider buying a vintage, rather than antique, Cameo piece for those non formal occasions. But the beauty of a true antique cameo is a thing to behold. Either way, here are the end things you should know about your antique shell Cameo. The settings. They came in a surprising number of materials including silver (like ours), gold (but not white gold), and brass. Brass was a surprise to me but I have seen garnets more than enough times set in brass.  At any rate, I hope you enjoyed this post and if you have any suggestions or you feel I should correct something, just post a comment and I will get right to it. I am not an expert or jeweler but,  I hope this has helped in your Antique Cameo quest. 


Please note that there are very nice fakes out there that will pass the heat test. Please take all things into account when choosing your Cameo. If in doubt, consult a vintage jeweler specialist.


My personal antique Cameo checklist:


 1. Cameo must have a concave back.                                                                                   
 2. Cameo does not have a lot of small pit marks.                                                                 
 3. Cameo does not have a white, milky, or foamy looking back.                                         
  4. Cameo has very sharp, distinct, carving.                                                                           
  5. Cameo has ornate flowers and other adornments.                                                             
   6. Cameo has upswept hair (not hair that hangs down which indicates a vintage Cameo).   
  7. Cameo has an older style setting with patina-unless cleaned.                                           
 8. Cameo's white parts are low to shell and blend into the carving.                                     
 9. Cameo has carving marks on, and around, the edges.                                                      
10. Cameo's nose is not "rounded".                                                                                      
 11. Cameo should be translucent when held to the light.                                                                                                                                          


AUTHOR: Rob Marshall           

Please share us with your friends.
 Our shop: http://       


Friday, 28 August 2015

Is This Brooch Vintage?

A collection of vintage brooches.

Disclaimer: Please be aware that there are varying views out there as to dating antique and vintage jewelry. The observations below are based on research and my general acceptance as to what constitutes dates and time periods for vintage and antique jewelry closures. If unsure, or have an opposite view, please seek a professional second opinion. Especially in the case of expensive gold or silver pieces. This blog deals with costume jewelry typically for sale in the costume jewelry market today. Thanks for stopping by and,  tell your friends about us if you found this interesting.


  How does one tell if a piece of jewelry is vintage or not? With today's remakes it can be hard to tell. Be on the lookout for the words "Vintage Style", "Vintage Look", and "Vintage Like". These generally mean you are getting a piece of jewelry (or jewellery as we in Canada spell it) that has been recently manufactured to look old. Not always, but about 90 percent of the time.

  Old pieces should have a bit, to a lot, of age showing up as discoloration or wear. Most of the wear is bound to show up where the piece meets the body or clothing. Please be aware that there will be some pieces referred to as "NOS" which simply translates to "New Old Stock", generally implying that the piece is old, just never worn. These come from store closeouts etc. where the items have sat around for years before being rediscovered. As it is today, some will buy a piece of jewelry and wear it a few times only to let it sit in a jewelry box for the remainder of their lives. So how do you tell?

  One of the quickest ways (though no one way is foolproof), is to check the back of the piece. Look for a brand name. Vintage companies, like all companies,  had a beginning and ending date range where they were in business. Just type "research vintage jewelry" into any browser and you should be able to find the dates and company stamps for most manufacturers on various websites. Although you will get a "began in 1940 ended in 1979 etc.", there are ways to muddle through the process of elimination to narrow down that date. Some stamps were only issued between certain years and changed as the company progressed in years. This could mean a different look to the way it was spelled. Maybe printed during certain years and then written out in script writing for a few more. You will also be surprised to find out some companies would change their product names completely as with Krementz, who added a Dept. Store line stamped simply "Diana".

  Now lets get down to the meat and bones of discerning a piece without research. Again, look at the back of the piece. The pointed pin and roll clasp get used the most, so look for wear and discoloration on these parts. Next, we will look at pin/brooch closures in photo's:


The wide C Clasp closure below dates from the 1800's to around the 1910's. The pin nestled into an open C that did not close around the pin. This closure may still be found on later pieces in the 20's-50's and right up to present day. If you have this closure, and see wear, rest assured you have an antique to vintage piece.


Antique Vintage Jewelry Wide C Clasp Closure


The next closure you see here is another type of C Clasp Closure. This is the type of closure, and wear, you really want to see in an antique piece. This was a simple thin wire that was open, and held the pointed pin in place. Notice the pointy part of the pin also extends past the brooch itself. These were unique, and quite rustic, with a simple closure to keep that brooch in it's place. Generally these are found on older, heavier pieces from the 1800's-1910. You do have an antique piece if you see this type of closure.


Antique C wire closure on a brooch.


Also in the mix will be the "Trombone Closure" or "Tube Closure". This secure little closure is definitely in the antique/vintage category. These have been described as being from the 1800's-1940's. Personally, I often date these between the 1920's and 1930's. These are quite often found on European Celluloid brooches, as well as on a few metallic pieces. You turn the closure and pull out the end to expose the pin, and put the piece on. You then push the end back in and turn to secure. On another type, you just pull out the end (which is a simple tube), position the pin, and push the end back in place with no turning required. This, in my opinion, is one of the most secure closures you can find on an antique/vintage piece.  More commonly seen in European, rather than American pieces.


The next closure I want to show you is the "Roll Clasp Closure". All it contains is a covering that rolls/spins over a C-clasp to lock the pin in place. These will date from the 1920's to today. The general consensus is that they were invented in the 1920's and caught on rather quickly with the manufacturers of the time. The first clasps had a rather shorter "head" that you grab onto to turn. Some also had just a spring mechanism that you would move outward, put in the pin, and then release to secure it. As they evolved, todays popular closure took on the modern look.


Finally you are going to come across, guaranteed, a false C-closure. This is just a closure that has lost it's spin head. It looks like a C-Clasp closure, but is not. This piece can be anywhere from the 1920's to now. If you aren't a purist, then a fine example with a broken spin clasp should do you no harm. There will be a decrease in resale value though. The first photo shows you the components that used to be part of the brooch. The last to photos show the piece missing the spin head but, still functions well as a pseudo C-closure. How can you tell if it is a C-Clasp Closure or a broken Spin Clasp Closure? Easy. The "C"  will be slightly wide but very thin. See my last two photo's. The exterior sides of the fake "C", will probably have scratches where the head constantly rolled over it. Real C clasp closures are "thicker" or "flare out" in thickness.


False C closure on a brooch.


Pseudo C closure on a brooch.


Spin closure parts of a brooch.


I hope you have enjoyed this little info blog and will return with more on dating a brooch soon.


Visit our online vintage shop at http://
 
Please mention this blog on your social site.